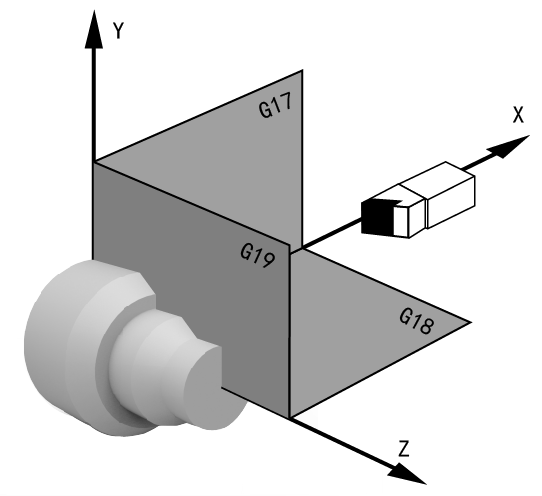
2.6 Work plane G17/G18/G19
Article Number: 497 | Rating: Unrated | Last Updated: Thu, Aug 25, 2016 2:44 PM
1. G17: X/Y plane
2. G18: Z/X plane (default G18)
3. G19: Y/Z plane
You mut determine the work plane before workpiece machining. Then tool radius compensation plane and infeed direction of tool length compensation is determined.

Fig.2.7 G17-19work plan definition
There are no attachments for this article.
There are no comments for this article. Be the first to post a comment.
Related Articles

5.3.2 Undercut CYCLE94
Viewed 3831 times since Fri, Aug 26, 2016
5.2.5 Reaming1 (boring 1) CYCLE85
Viewed 10652 times since Fri, Aug 26, 2016
5.2.1 Drilling, centering CYCLE81
Viewed 13686 times since Fri, Aug 26, 2016
4.1 Arithmetic parameter R
Viewed 1833 times since Fri, Aug 26, 2016
1.1 Coordinate systems
Viewed 3640 times since Thu, Aug 25, 2016
5.2.3 Deep-hole drilling CYCLE83
Viewed 14221 times since Fri, Aug 26, 2016
5.3.1 Groove CYCLE93
Viewed 4249 times since Fri, Aug 26, 2016
1.8 G function group
Viewed 2408 times since Thu, Aug 25, 2016


